Garage Door Drums and Replacement
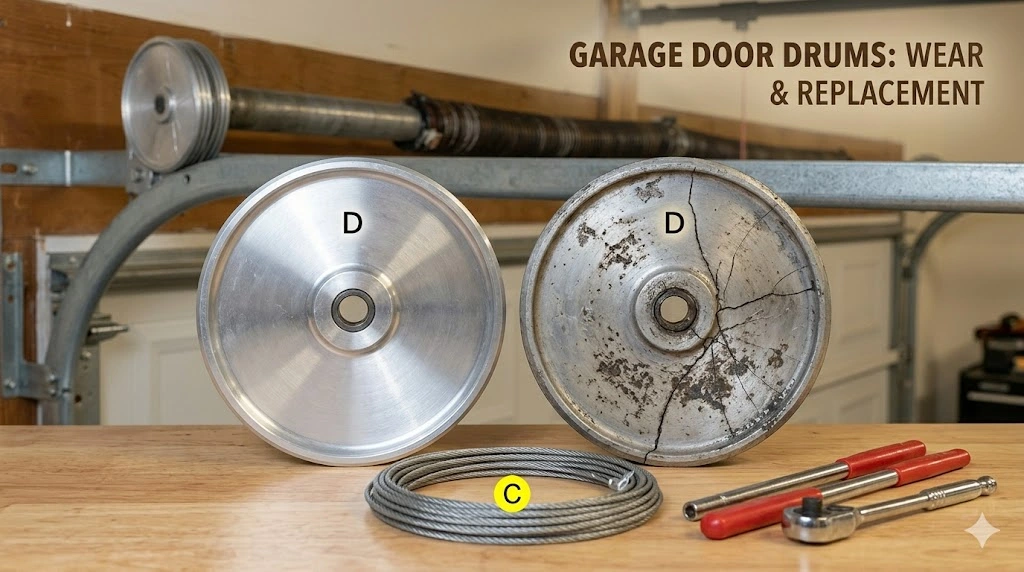
Garage door drums are cylindrical metal spools mounted on the torsion shaft above your garage door. They wind and unwind the lift cables to raise and lower the door. You need to replace them when you notice visible cracks, warping, broken sections, rust buildup, frayed cables, or uneven door movement. Most drums last between 10,000 and 15,000 operating cycles before they start showing signs of wear.
If you have ever heard a grinding noise when your garage door opens or watched one side of the door tilt while the other moves smoothly, there is a good chance the drums are involved. Most homeowners know about torsion springs and garage door openers, but the drums quietly do some of the heaviest lifting in the system. They are small, they are often overlooked, and when they fail, the consequences range from an annoying squeak to a door that crashes down without warning.
This guide covers everything you need to know about garage door drums, including what they do, the types available, the warning signs that something is wrong, and when it is time to call a professional for a replacement.
What Are Garage Door Drums?
Garage door drums are cast aluminum or steel spools that sit at each end of the torsion shaft, which is the horizontal bar mounted above the garage door opening. Each drum connects directly to a lift cable, which runs down and attaches to the bottom bracket at either side of the door.
When you activate the garage door opener or manually lift the door, the torsion spring transfers stored rotational energy through the shaft. The drums rotate with the shaft, winding the lift cables upward and pulling the door open in a controlled, even motion. When the door closes, the cables unwind from the drums and the door descends smoothly.
Think of the drums as the pulley system that converts the spring’s rotational force into vertical movement. Without properly functioning drums, that energy transfer breaks down entirely. The door might rise unevenly, the cables can slip off, or the entire system can seize up mid-operation.
It is worth noting that garage door drums work as a pair. One sits on the left side of the torsion shaft and one on the right, and they must be perfectly matched in size and type for the door to travel evenly on both sides of the track.
How Garage Door Drums Work Within the Larger System
To really understand why drums matter, it helps to picture the full torsion spring system together.
The torsion spring is coiled around the center of the spring shaft and held in place by a center bracket and two end bearing plates. When you close the garage door, the spring winds up and stores mechanical energy, much like a coiled watch spring. The lift cables, wrapped around the drums at each end of the shaft, hold tension against that stored energy.
When you open the door, the spring unwinds and that energy spins the shaft. The drums rotate along with it, winding the cables upward and lifting the door off the ground. The grooves machined into the drum surface keep the cable seated in a precise path during every cycle so it wraps evenly without bunching or slipping.
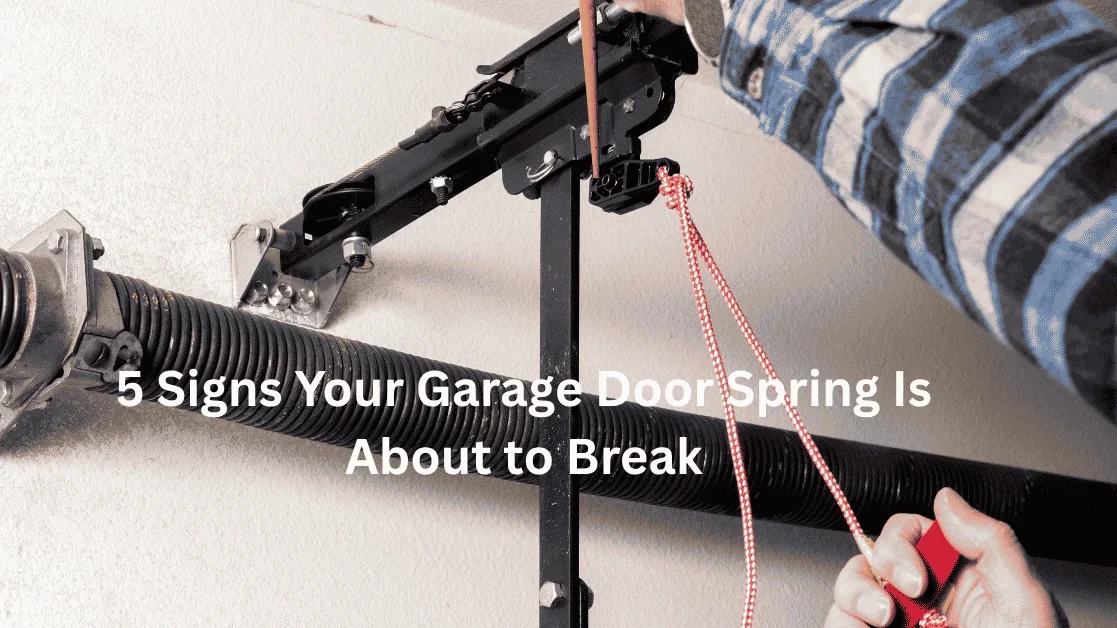
This means drums and torsion springs are completely interdependent. A broken torsion spring releases all cable tension, and the cables can jump off the drums immediately. Knowing the signs your garage door spring is about to break early can save you from drum and cable damage at the same time. If you suspect your spring is the root cause, a prompt garage door spring replacement can prevent further damage to the drums and cables.
Types of Garage Door Drums
Not all garage door drums are the same, and choosing the wrong type for your specific door setup can lead to premature wear, uneven lifting, or even damage to the entire system. The type of drum you need depends on your door height, the amount of headroom available in your garage, and whether your door uses a standard, high lift, or vertical lift track configuration.
Standard Lift Drums
Standard lift drums are by far the most common type found in residential garages. They feature a flat, slightly curved groove surface that allows the cable to wind at a consistent distance from the shaft as the door travels from the vertical section of the track to the horizontal section near the ceiling. Standard lift drums are available in 4 inch, 5.25 inch, and 8 inch diameters, with the size determined by the door height and cable length required.
If your garage door follows the typical path, rising vertically and then curving back to rest parallel to the ceiling, a standard lift drum is almost certainly what you have.
Vertical Lift Drums
Vertical lift drums are taller and slightly conical in shape compared to standard lift drums. They are designed for doors that travel almost entirely straight up along the wall rather than curving onto a horizontal overhead track. This configuration is common in commercial warehouses, loading docks, and industrial facilities where maximizing headroom is a priority.
Because the door never transitions to a horizontal track, the cable must keep winding closer and closer to the shaft as the door rises. The conical shape of the drum accommodates that progressively tightening wrap. Vertical lift drums come in 8.5 inch, 11 inch, and 13.5 inch outer diameters depending on the cable capacity required.
High Lift Drums
High lift drums are essentially a hybrid between standard and vertical lift designs. They have a raised conical section for the initial vertical rise of the door and a flat section for the horizontal run near the ceiling. This dual geometry lets the drum handle a door that travels farther up the wall before curving overhead, which is useful when a homeowner wants additional vertical clearance inside the garage for a car lift, shelving, or overhead storage.
High lift drums are available in diameters ranging from 4 inches to 8 inches and are selected based on the exact amount of additional lift built into the track layout.
Low Headroom Drums
Low headroom drums are used in garages where the space between the top of the door opening and the ceiling is too tight for a standard torsion spring setup. They are compact in design and allow the cable and spring system to operate with minimal overhead clearance. These are less common in newer construction but frequently found in older homes with low garage ceilings.
Signs That Your Garage Door Drums Need Replacing
Drums tend to wear gradually, so the warning signs often sneak up on homeowners. Catching them early can save you from a much more expensive repair down the line, since a failing drum can damage the lift cables, accelerate spring wear, and put extra strain on the garage door opener motor. If you notice your opener struggling or running louder than usual, it may be worth looking into garage door opener repair or replacement alongside the drum inspection.
Visible Cracks or Breaks in the Drum
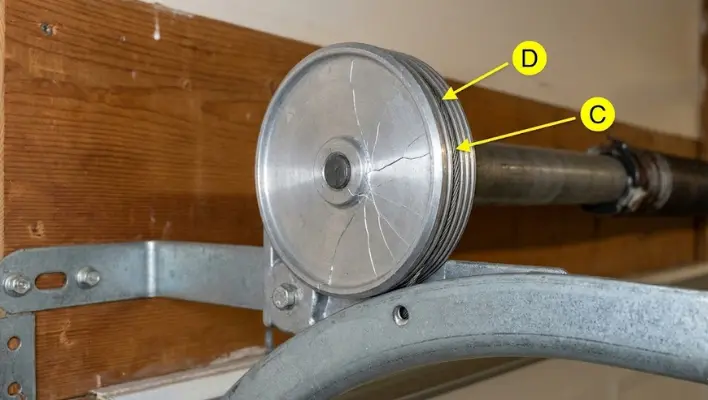
The most obvious red flag is physical damage you can see with the naked eye. Cracks, chips, or broken sections anywhere on the drum body mean it is no longer structurally sound. Even a hairline crack can worsen rapidly under the constant tension of the cable and the rotational force of the shaft. If you can see broken material, plan for a replacement right away rather than waiting for the drum to fail completely.
Warped or Deformed Shape
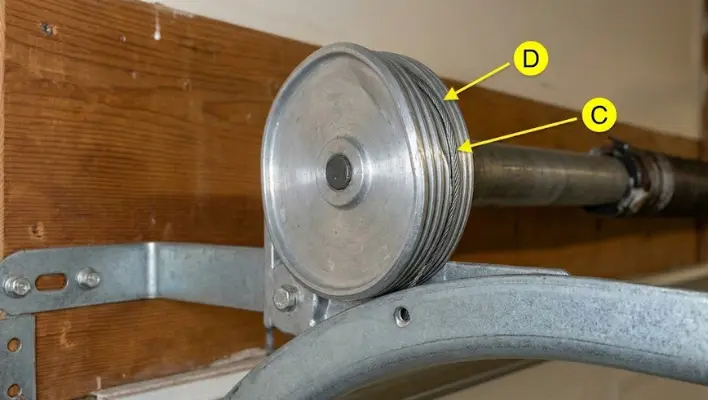
Drums are precision components, and their geometry matters. If a drum has become warped, possibly from corrosion, heat exposure, or an impact, the cable will not wind evenly in the grooves. This leads to uneven lifting, where one side of the door rises faster than the other, and can eventually cause the cable to jump out of the groove entirely.
Cables Slipping or Coming Off the Drum
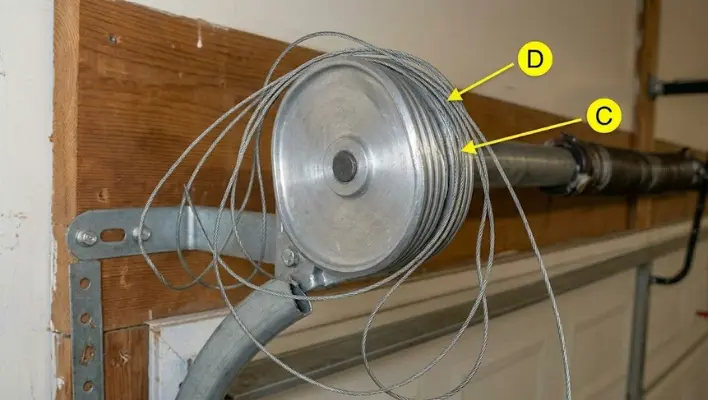
If you find your garage door cables lying loose at the base of the door or draped alongside the track, the drums may be the cause. A worn groove surface, a cracked drum flange, or a drum that has shifted on the shaft can all allow the cable to unseat. While a broken torsion spring is the most common cause of cable detachment, worn drums are a close second and should always be inspected when cables come loose. Whether the culprit is a worn drum or a related component, getting a professional garage door repair service scheduled early prevents minor cable issues from turning into costly failures.
Uneven or Jerky Door Movement
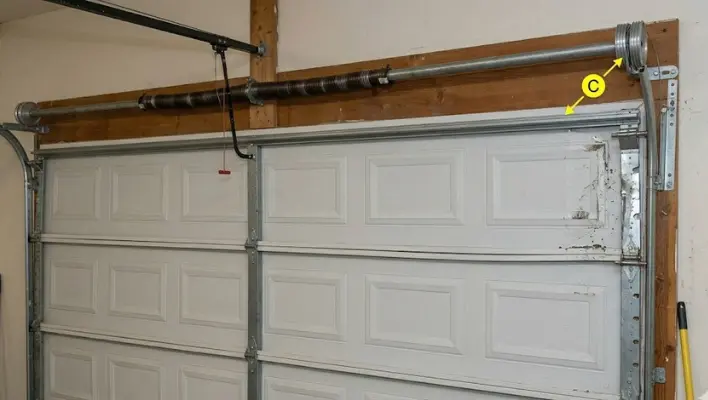
A properly balanced garage door should glide smoothly and evenly from top to bottom with no tilting, hesitation, or side to side variation. If you notice the door seems to hang lower on one side, sways during movement, or jerks and stutters as it opens, the drums may not be winding the cables at the same rate. This imbalance puts extra stress on the rollers, hinges, and tracks and can cause damage throughout the system if left unaddressed.
If the door stops or tilts mid travel, worn drums are one possible cause, but not the only one. Our breakdown of a garage door gets stuck halfway covers the full range of reasons this happens.
Loud Grinding, Squealing, or Rattling Noises
All garage doors make some noise, but a new grinding or metallic rattling sound during operation often points to the drums. Loose set screws that allow the drum to wobble on the shaft, debris caught in the groove, or corrosion eating into the metal can all generate noise. A periodic squealing sound that corresponds exactly with the drum rotation is a particularly telling sign.
Rust and Corrosion
Drums are typically made from cast aluminum or steel, and while aluminum resists rust well, steel drums in humid climates are vulnerable to corrosion over time. Surface rust alone may not require immediate replacement, but deep corrosion that has pitted the cable groove or weakened the drum body is cause for concern. Corroded grooves can chew through cables much faster than normal, so inspection and replacement is the safer call.
Age and Cycle Count
Even drums that look fine on the outside eventually reach the end of their service life. Most residential garage door drums are rated for somewhere between 10,000 and 15,000 cycles. If your household opens and closes the garage door four times a day, you will hit 10,000 cycles in roughly seven years. If your door gets heavier use or was installed in a home with a busy family, that number arrives faster.
If your drums are original equipment on a door that is more than a decade old and you have never had them inspected, scheduling a professional tune up is a smart preventive measure even if everything appears to be working.
Why You Should Always Replace Both Drums at the Same Time
One of the most common mistakes homeowners and even some inexperienced technicians make is replacing only the drum that appears damaged. Since both drums are mounted on the same shaft and operate in tandem, replacing just one creates a mechanical imbalance. The new drum and the old drum will wind cable at slightly different rates, causing the door to tilt during operation and placing uneven loads on the rollers, hinges, and tracks.
Beyond the alignment issue, replacing both drums at the same time is simply smart maintenance economics. If one drum has reached the end of its usable life, the other is almost certainly close behind. Installing two new matched drums at once saves you the labor cost of a second service visit and keeps your system in balanced condition for the full lifespan of the new components.
Can You Replace Garage Door Drums Yourself?
This is where many enthusiastic DIYers hit a real limit. Replacing garage door drums is not a beginner project, and the reason comes down to the torsion spring sitting directly on the same shaft as the drums.
Torsion springs store an enormous amount of mechanical energy, enough to cause serious injury or death if released suddenly. Working on the drums requires loosening the set screws that lock them to the shaft, which can allow the shaft to spin freely. If the spring is not properly wound down before this work begins, the results can be catastrophic.
Professional garage door technicians have the specialized winding bars, cable tensioning tools, and hands on training to work around torsion spring systems safely. While it can be tempting to save a service call, this is one of those repairs where the risk to personal safety genuinely outweighs the cost savings. The DASMA (Door and Access Systems Manufacturers Association) consistently advises homeowners to leave torsion spring related work to qualified technicians.
That said, you can safely inspect your drums from the ground using a flashlight and binoculars or a phone camera on a selfie stick. Looking for visible cracks, rust, or cable misalignment from a safe distance is entirely reasonable and gives you useful information to share with a technician when you call.
How to Extend the Life of Your Garage Door Drums
With a little routine attention, you can push your drums well beyond the average service interval and catch problems before they escalate into full replacements.
Schedule an annual inspection with a qualified garage door technician. A yearly tune up typically takes less than an hour and covers the entire mechanical system, including the drums, cables, springs, rollers, hinges, and tracks. Catching a developing crack or a loose set screw during an inspection costs far less than an emergency service call after a cable snaps.
Keep the drums clean. Garage environments accumulate dust, oil mist from vehicles, and seasonal debris. Wiping down the drum surface and cable grooves every few months removes buildup that can accelerate wear on the cable and the groove surface.
Lubricate the right components. The drums themselves do not require lubrication, but the torsion spring, rollers, and hinges benefit from a light application of a dedicated garage door lubricant, not WD 40, which attracts dirt rather than repelling it. A well lubricated system reduces the mechanical load on every component, including the drums.
Watch for the early warning signs described in this article and act on them promptly. A minor wobble today becomes a snapped cable next month. Addressing small issues while they are still small is the most effective maintenance strategy there is.
Schedule an annual inspection with a qualified technician. A routine garage door maintenance service covers the full mechanical system including drums, cables, springs, rollers, and tracks.
What to Expect During a Professional Drum Replacement
When you call a garage door technician for a drum replacement, the process typically unfolds as follows.
The technician will begin with a full system inspection to confirm that the drums are the primary issue and identify any secondary problems, such as worn cables or a damaged spring, that should be addressed at the same time. Since the drums and cables work together so closely, replacing drums without inspecting the cables is generally poor practice.
Next, the technician will safely release tension from the torsion spring using calibrated winding bars and secure the door in place so it cannot move unexpectedly. The old drums are then removed from the torsion shaft, the new matched pair is installed and locked into position with properly torqued set screws, and the lift cables are reconnected and tensioned correctly.
Finally, the spring is rewound to the correct tension for your door weight, the system is tested through several full open and close cycles, and the door balance is verified. A properly balanced door, when disconnected from the opener and raised to the halfway point, should stay in place without drifting up or down.
The entire process typically takes between one and two hours for a standard residential door.
Frequently Asked Questions
How long do garage door drums last?
Most residential drums last between 10,000 and 15,000 operating cycles, which translates to roughly 7 to 14 years depending on how often the door is used.
What causes garage door drums to wear out faster than normal?
High cycle use, lack of lubrication on surrounding components, cable misalignment, corrosion from humidity, and operating a door that is out of balance all accelerate drum wear.
How much does it cost to replace garage door drums?
Drum replacement costs vary by region and service provider, but most homeowners pay between $150 and $350 for a professional drum replacement, including parts and labor. Replacing the cables at the same time adds a relatively modest amount to that cost and is generally recommended.
Is a loud garage door always a sign of bad drums?
Not necessarily. Noise can come from worn rollers, loose hardware, a dry torsion spring, or an unlubricated track. However, a grinding or metallic rattling sound that correlates precisely with the drum’s rotation during opening and closing is a strong indicator that the drums deserve a closer look.
Can I use any drum as a replacement, or does it have to match my existing one?
It must match. The drum size and type need to correspond to your door height, track lift configuration, and cable diameter. Using the wrong drum can cause cable slippage, uneven door travel, and accelerated wear on other components.
Final Thoughts
Garage door drums are one of those components that most people never think about until something goes wrong. They sit quietly at each end of the torsion shaft, winding and unwinding cables thousands of times a year, and rarely get the credit they deserve for keeping a several hundred pound door moving safely and smoothly.
Understanding what they do, knowing the warning signs of wear, and having a maintenance plan in place puts you well ahead of the average homeowner. When the drums do eventually show their age, bringing in a qualified technician rather than tackling the repair yourself is the single most important decision you can make for both safety and long term system performance.
A well maintained garage door system, drums included, should give you decades of reliable service. The occasional inspection and timely replacement when the signs are there is all it takes.